Fiskars Simple 3-in-1 Tag Maker

Fiskars 3-in-1 Tag Maker ReviewI have been looking for a tag maker for some time but haven’t been able to find one I trusted with the dimensions I wanted.   Watching the new series of Crafty Beggars in the House! on the Community Channel, I saw them use some Fiskars tag punches to upcycle some cards – exactly what I needed!Fiskars simple 3-in-1 Tag Maker With Eyelets
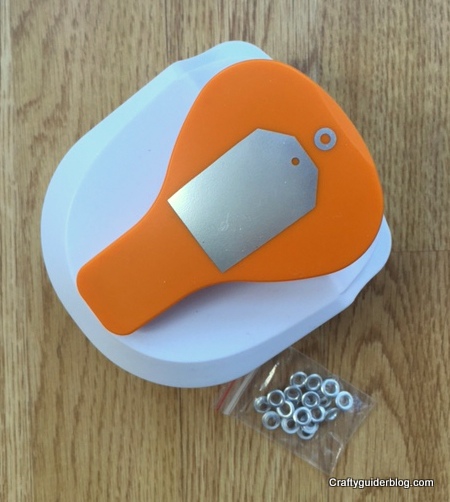
I bought mine from Amazon and chose the Simple design as I like the shape.   The tag punch is substantial and sturdy – what I expect from Fiskars – and comes with 20 metal eyelets.   I have a large stash of last year’s Christmas cards and set to work on them to make some tags for this Christmas.Fiskars Simple 3-in-1 Tag Maker Card PreparationHaving selected the area of the design to use, I trimmed the card so that I could get the punch in the right place.Fiskars Simple 3-in-1 Tag Maker Punching Tag
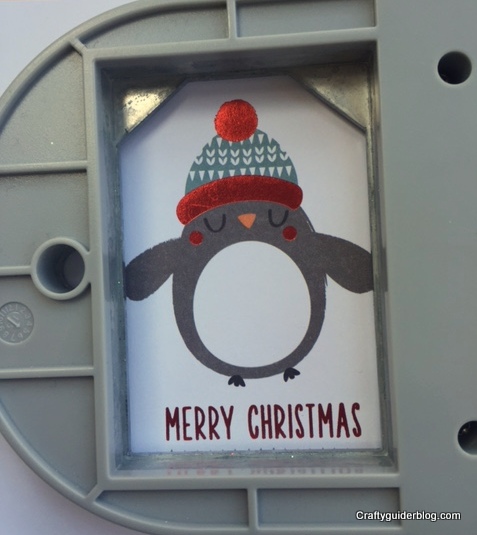
With punches, I always find that turning the whole thing upside down and viewing the design through the aperture gets it cut out accurately.   The punch cut through really easily, even on cards with glitter or cards with textured finishes.Fiskars 3-in-1 Tag Maker Punching Hole
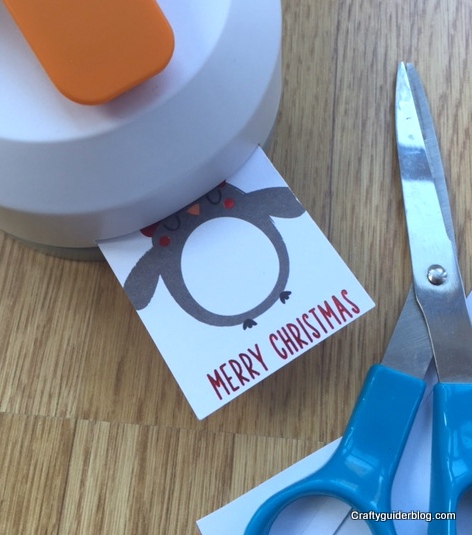
Once the card is cut, there is another slot to put the tag into to get the hole cut accurately.Fiskars 3-in-1 Tag Maker Punched Tag
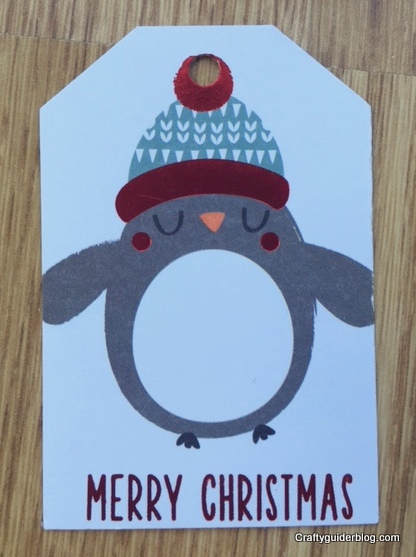
Right on the pompom!   The tags can be left like this with ribbon or string threaded through the hole (as a good Guide leader, I use a cow hitch or lark’s head knot).   The pack also comes with metal eyelets which can be used to reinforce the hole and make a really professional finish.Fiskars 3-in-1 Tag Maker Applying Eyelet
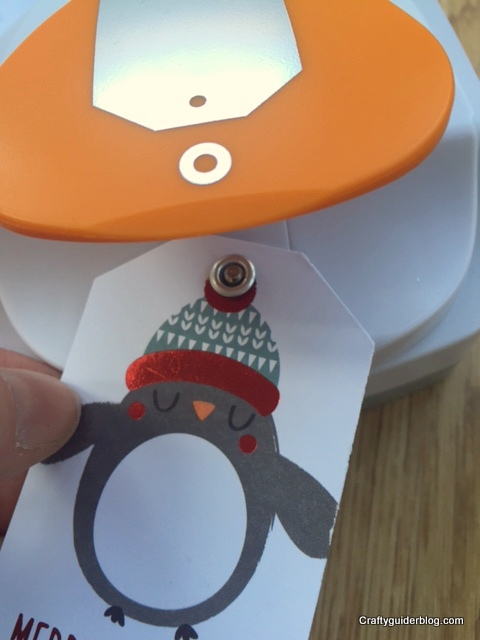
Simply feed the hole in the tag over the post under the handle, add an eyelet and squeeze.   It doesn’t feel like you are doing much and that you need to press harder, but the eyelet attaches really easily.Fiskars 3-in-1 Tag Maker Finished Tag
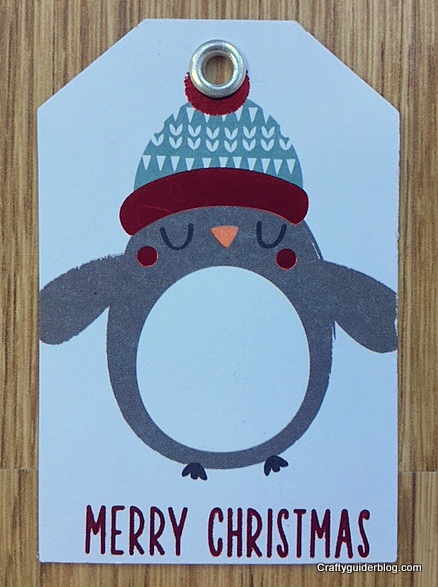
I am never throwing away a card again.   I had some cards that I’ve used to make birthday tags, as well as the Christmas tags.   I also have my eye on youngest Craftyguidelet’s birthday cards at the moment, and they will be going through the punch as soon as they come off the mantelpiece.Fiskars 3-in-1 Tag Maker Tags
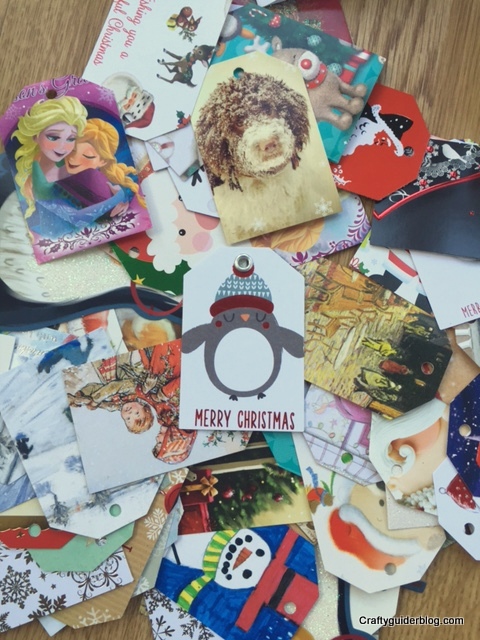
I think this lot will get me though next Christmas, and all for just the price of the punch and a bit of twine.    I also have plenty of card in my stash to get me through every possible occasion outside of Christmas so if you need me, I’ll be punching tags out of whatever will fit in the machine!

Disclaimer: I own this punch and I haven’t been asked to review it, or been paid to review it.   All opinions are my own, and I have added some links to the normal Amazon site where I bought mine.   They are not affiliate links and I don’t get any money if you click on them.

Review – How to Bake by Paul Hollywood

Paul Hollywood How to BakeI’ve had Paul Hollywood’s How to Bake book since it came out in 2012 and I have used it for simple bread recipes.   The problem is that it is a gluten fest and anything I bake from it can’t be eaten by gluten intolerant Mr CG.   This means extras for the Craftyguidelets and myself, but that means an expanding waistline for me!Paul Hollywood How to Bake doughTo try something different, I used Paul’s recipe for Hot Cross Buns rather than my normal cut-from-a-magazine-and-stashed-in-my-recipe-file one which I’ve used before.   I say “used the recipe”, but I follow my Master Baker Dad’s advice and bung in much more dried fruit and spices than normal recipes state.Paul Hollywood How to Bake recipeThe recipe was easy to follow, and some of the techniques such as piping the crosses on brought back memories of when my brothers and sister and I “helped” in the bakehouse when we were young.Paul Hollywood How to Bake crossesIt took several hours to keep proving the dough at each stage before I could bake them, but having been brought up in a family bakery with my Dad’s fruity, spicy hot cross buns, I can’t buy the sorry excuses that supermarkets sell these days.Paul Hollywood How to Bake hot cross bunsThey turned out really well and were probably a bit knobbly because I’d crammed in so much fruit, but they were delicious.Paul Hollywood How to Bake buttered hot cross bunsWarm from the oven and spread with butter.   Definitely not Slimming World friendly, but Easter only happens once a year.   Unless you count Orthodox Easter of course!

Disclaimer: I own this book and I haven’t been asked to review it, or been paid to review it.   All opinions are my own, and I have added some links to the normal Amazon site where I bought my copy.   They are not affiliate links and I don’t get any money if you click on them.

Review – Cath Kidston Sewing Book

Cath Kidston Sewing BookFather Christmas was very generous this year and got me the latest Cath Kidston Sewing Book.   I have other Cath Kidston books in the bookcase already, and this one is a similar format.   The book comes with a kit using Cath Kidston fabric, and a variety of projects with patterns to photocopy at the back.Cath Kidston Sewing Book ContentsThere are more than 30 simple patterns in the book for a wide range of projects, together with basic techniques explained at the beginning.  I started with the kit supplied with the book which was for a pocket sewing kit.Cath Kidston Sewing Book kitThe fabric was pre-cut so I didn’t need the pattern which I photocopied from the back.   However the fabric was cut incorrectly.   As the very lovely bird fabric is directional, the outside panel needed to be cut a certain way so that the bottom pocket was the right way up.   This is clearly explained in the instructions, however the manufacturer obviously didn’t read them!   It meant that there was a curved edge where there should’ve been a straight edge, and so there was a gap at the edges.Cath Kidston Sewing Book Finished KitI did find some of the instructions a bit vague, but the finished product is nice.   It has one zipped pocket, one open pocket and one buttoned pocket.   The instructions tell you how to make buttonhole loops but I put in machined buttonholes for speed.   The book seems aimed at beginners, but I found I needed some experience to make sense of some of the stages.

What crafty presents did Father Christmas bring you?

Disclaimer: I own this book and I haven’t been asked to review it, or been paid to review it.   All opinions are my own, and I have added some links to the normal Amazon site where I bought my copy.   They are not affiliate links and I don’t get any money if you click on them.

Review – Sweets Made Simple by Miss Hope and Mr Greenwood

Last year I was blown away by the BBC2 series ‘Sweets Made Simple’ with Miss Hope and Mr Greenwood.   I loved the variety of sweets and the way the programme was presented.   I downloaded the book to my tablet but found that it was neglected.   Just before Christmas I treated myself to the hardback copy and was able to appreciate the recipes much better.sweets made simple contentsThe first part of the book has some really helpful notes about the alchemy of sweet making: important things to remember when working with hot sugar, what the difference between soft ball and hard crack is, the ins and outs of using chocolate, and how to store your creations when you are done.   Who am I kidding?   Storing the sweets?   They’ll all be gone before they need to be stored!sweets made simple raspberry coulisThe first recipe I tried was Raspberry Marshmallows.   Even from the first stage of making the raspberry coulis (or lovely ruby-red mush as described in the book) I was hooked.sweets made simple raspberry marshmallow settingYou need to devote a good hour or so making it, followed by a couple of hours sitting on your hands, resisting the urge to dig a spoon in and eat your body weight in creamy, sugary loveliness.sweets made simple raspberry marshmallowsThis marshmallow is GORGEOUS!   The raspberry coulis is marbled through the soft creamy marshmallow, and the fresh raspberries are juicy little accents.   I think this should be one of your five a day.sweets made simple raspberry marshmallowThere are so many recipes I’ll be trying in this book.   Next on the list is Penuche which is a type of fudge, and I’ve got enough ingredients in the cupboard to try making Cinder Toffee.   Looks like the Slimming World target is slipping further away…

Disclaimer: I own this book and I haven’t been asked to review it, or been paid to review it.   All opinions are my own, and I have added some links to the normal Amazon site where I bought my copy.   They are not affiliate links and I don’t get any money if you click on them.

Review – Gluten Free Baking by Michael McCamley

In my quest to use more of my book collection, I had to start somewhere, and cake is a very good place to start.

Mr Craftyguider has a gluten intolerance, so to make sure he can share some of the responsibility of consuming cake calories, I mostly bake with gluten free ingredients.   Because of the nature of gluten free ingredients, I usually follow recipes that are specifically gluten free rather than just substituting gluten free flour for wheat flour in standard recipes.

Gluten free baking book contents pageMichael McCamley’s Gluten Free Baking book was recommended by someone on twitter and there is a wide variety of bakes inside.   I am after the elusive recipe for decent gluten free bread and pastry I can bake at home.Gluten free baking book info pagesThe book starts with an introduction on what gluten is, the different problems people can experience with an allergy or intolerance to gluten, where to look for gluten in foods, and what alternatives are available.Gluten free baking book small cakesI chose the recipe for banana muffins with maple cream frosting from the first chapter as I had all the ingredients to hand, as well as some very spotty bananas to use up.   The recipe method isn’t as detailed as some I’ve used in the past, and the mix looked wrong at some stages of the process.   However, I trusted the recipe and got to a mix consistency I recognised as cake batter at the end.Gluten free baking  book Banana muffin with maple cream frostingThe resulting cake tasted as good as it looks, and I couldn’t tell that it was a gluten free cake.   It was lovely and moist, had loads of banana, and the maple syrup cream cheese frosting was divine.   We ate them over 3 days and they kept perfectly well in a tin in the fridge.Gluten free baking book large cakesThere is a wide variety of cakes and biscuits in this book and I will definitely be trying more out based on my first success.   The book gives recipes for flours to blend at home to make the various mixes (e.g. bread flour, self raising etc.), but I prefer using the Doves Farm branded pre-blended flours available from most supermarkets where I can.   I once counted 19 different types of gluten free flours and standard wheat flours in my baking cupboard when I used to do home blends.   That was too much to store and keep track of, so I’m currently at about 8.Gluten free baking book breads and pastriesBreads and Savoury Pastries are the gluten free recipes I’ve never mastered.   I think that the structure the gluten gives them is more important than in a cake.   Perhaps this is the book that will solve these problems.Gluten free baking Phil VickeryThese Phil Vickery books were the first gluten free books I tried that I had success with (and also the reason I had lots of flours to blend in my cupboard!).Gluten free baking Cake AngelsMy go to book for easy baking is the Cake Angels book by Julia Thomas.   It uses basic ingredients that are easy to get hold of, the instructions are simple to understand, and there is a wide range of cake recipes.   Again, the recipes don’t taste like they are gluten free.   She does also make the recipes dairy free, but I sometimes substitute the dairy free ingredients for ones that contain dairy as we don’t have a problem with lactose.

Do you have a favourite gluten free baking book which always gives you good results?

Disclaimer: I own all of these books and I haven’t been asked to review them, or been paid to review them.   All opinions are my own, and I have added some links to the normal Amazon site where I bought my copies.   They are not affiliate links and I don’t get any money if you click on them.

Books About Town Trails

As a family, we love trails.   Mr Craftyguider loves orienteering and the Craftyguidelets and I have done a couple of string courses.   Going round a museum captures the interest of a child more if they have a series of exhibits to find.   We are also geocachers and spend time lurking around trying to look nonchalant whilst one member of the party digs out a hidden tupperware box to log our find without being spotted.
IMG_4157
This summer we are looking for brightly painted benches in the shape of books on the Books About Town trails in London.
IMG_4094There are 50 benches to find on 4 trails.   We started with the Brick Lane bench near the Museum of London on the City Trail.
IMG_4093There is also a quiz to download so for some of the benches you need to look a bit harder at the detail to answer the questions.
IMG_4123The backs of some of the benches are as stunning as the fronts.   This is from the Great Expectations bench on the Riverside trail.

The bench I really wanted to spot was the Dr Seuss bench which is near More London outside the London Assembly building.
IMG_4139IMG_4140The Craftyguidelets loved the Axel Scheffler and Julia Donaldson bench.
IMG_4154I love the bench, but we took ages to spot it.   The list of benches says it’s in the Hay’s Galleria near London Bridge station.   We walked round, underneath, around, through, and eventually found it a few metres down the riverbank and not in the Galleria at all.
IMG_4099The Mary Poppins bench was a bit damaged.   It was the first bench of many where we had to ask an unsuspecting tourist to move so we could photograph it from all angles!   Luckily everyone was OK about it, especially when two cute Craftyguidelets were looking hopefully at them.
IMG_4109We have now found all the benches on the Riverside trail and 5 on the City Trail.
IMG_4121New events are being added to the website all the time including a competition to design your own Shakespeare bench to win prizes.
IMG_4102The book trail runs until 15th September, after which the benches are being auctioned off in aid of the National Literacy Trust.   Could someone get one for me please?   With the exception of the Fever Pitch bench though.   As a Spurs fan, I have to draw the line!
IMG_4106IMG_415116 benches done over 2 trips to London.   Can we do the other 34 by the closing date?

Museum of London – Review

With the Craftyguidelets learning about the Great Fire of London in KS1 and Stone Age to Bronze Age in KS2 next term, we planned a day trip to the Museum of London near St Paul’s Cathedral to do a bit of ‘research’.

London Wall

The museum is right in the heart of the history it is curating.   Parts of the London Wall are ‘displayed’ through windows on the upper level.   I’ve no idea why the man in the picture appears to be taking a selfie lying down in the shade of the wall!

We were met at the door by a member of staff who asked us about our visit.   She showed us to the various activity sheets for children which you can also download before you leave home.   We picked up the War, Plague and Fire one for youngest Craftguidelet.   As there was nothing for eldest to have, the staff member got her some leaflets with pictures from the gallery, and also lent her a clipboard and A4 paper to draw pictures and take notes on.   She also met up with us later in the day and showed a genuine interest in what the Craftyguidelets had done.   It’s great when someone goes above and beyond the call of duty.

Photography is permitted in the museum but flashes aren’t so forgive the dodgy pics!
IMG_4039The galleries inside take you on a chronological journey through the history of London, starting in the ‘London before London’ gallery.   This took us from the Stone Age through to Bronze Age with displays of artefacts discovered in the London area.
IMG_4047This Bronze age helmet is supposed to demonstrate the ferocity and virility of the owner.   Not your normal head gear for a night on the pull any more!
IMG_4055The Roman area had this mock up of a Roman house.   I love the mosaic floor.

Moving on through Medieval London and past a 100 year old model of the old St Paul’s cathedral, we arrived in the War, Plague and Fire gallery.   There was a quite disturbing film presentation of the spread of the Black Death which we moved on from, and then on to the Great Fire of London.
IMG_4062It was great to show 5 year old Craftyguidelet examples of houses and how people lived in 1666 when the fire happened, as a background to what she will be learning about in the classroom.   The museum is also in the area where the fire took hold, which also gave her another perspective.
IMG_4064These fabulous dresses were in a recreation of the Pleasure Gardens.   I was a bit confused by the film dramatisation that was projected as part of the experience though.

After travelling through the Victorian shop recreations, we carried on moving through history to modern London.
IMG_4069This is a bronze lift from Selfridges from 1928.   I love the grandness of it.
IMG_4071The Suffragettes were also featured with a large display, including this embroidery from Holloway Prison.
IMG_4075This was from a display of equipment from a bakery demolished in 1966 to make way for a new development.   Being a Master Baker and Confectioner’s daughter, I am drawn to bakery memorabilia.
IMG_4083IMG_4086Probably the most thrilling part for me was the story of the development of the Olympic cauldron from the 2012 London games.   The actual petal for Great Britain was displayed.   I didn’t realise there were 3 cauldrons made – one for the Olympics, one for the Paralympics and one for testing.   The scale and the detail were staggering.

We really enjoyed our day out at the museum.   It held everyone’s interest throughout our visit, and there are probably details we missed to go back and see another time.   Entrance is free but we did leave a donation in the box.

This review is based on my own opinion of our family day out.   I received no incentives to go or to write a review.

Beginners Crochet Class at Betty Makes

Red floral crochet hook roll

For the last few years I have wanted to learn to crochet.   I own about 10 hooks for some reason, I’ve got the books, I’ve made a crochet hook roll, but I’ve never progressed very far.

A couple of years ago I met up with Jean-Mary (@meanyjar) at a craft show.   We had been tweeting for some time, and after some retail therapy, we sat down for some lunch.   After a chat, she set about trying to teach me some crochet.   To say my hands were not designed for crochet was an understatement.   Just holding the yarn was a problem, holding the hook wasn’t much better, and then moving the hook…you get the picture.

Despite this experience, Jean-Mary went on to open Betty Makes to teach her crafty skills to others.   I signed up for her crochet course which takes students from beginners, learning new skills and stitches, through to the granny square.

Lesson one started with picking up a small sample of crochet already started by Jean-Mary and working doubles into it.   Having someone else’s stitches to work into was a lot easier than my first foray where my tight foundation chain was not having any of it.   A couple of rows of doubles later, (and holding the yarn properly for the first time ever!) I was doing trebles.   The satisfaction as my wonky, uneven mini sample grew was fantastic.

beginner crochet sampler


Next we moved on to working from a pattern.   I have discovered that it is hard to count to 29 when you are busy chatting and drinking tea, but my pot holder is growing nicely, albeit having gone down to 23 stitches somewhere!

beginner crochet pot holder


The cost of the course includes the hook, pattern and wool, so I have 2 weeks to practice my neatness and counting at home, before I go back and learn more.   Next lesson includes making some tea gloves.   Depending on my technique, I’ll either wear them myself or end up giving them to the kids if I drop too many stitches!

Are you learning a new skill in 2014?

Crafty Creatives Box 13

I’ve been subscribing to the Crafty Creatives boxes since box 2.   I missed box one which was floral themed, and now their birthday box, box 13, is a flower fest.

IMG_3389Normally the boxes are made up of an art card, some themed craft supplies and a kit.   However this special birthday box has 5 kits for different flowers, plus some other goodies.   One item that wasn’t photographed was the birthday balloon.   With 2 Craftyguidelets in the house, this was nabbed as soon as I opened the box.

The first kit involved changing this pile of goodies…

IMG_3393…into this lovely stocking flower.

IMG_3400I’ve still got enough bits to make more, and I’ll be on the lookout for some cheap coloured tights for different colours.

Next up I powered up the glue gun to make the felt flower.

IMG_3403I just don’t think this came out very well.   Added to this the fact that I managed to burn my finger on the glue, it was my least favourite project.   I might save the orange felt sheet for something else rather than making another one.

Next came the paper rose hair slide.

IMG_3406I’ve made flowers like this before, but I don’t think I’ll be making it into a hair grip.   There are some lovely beads in previous boxes that I haven’t used yet that may become hair clips instead.

Finally came the crepe paper flower bunch.

IMG_3405This was my second favourite project after the stocking flower (once I’d juggled various pots of PVA and dug out nozzles with bent paperclips).   I might make this into a lollipop tree using a thin piece of dowelling and a pot.

The last kit is the French beaded flower.

IMG_3411This requires more time so it’ll be kept for another evening crafting session.

I’m still left with some other goodies to use up.   Probably some necklaces and some papercrafting in the future.

IMG_3413I have had fun with this box.   I’ve made more than usual because it’s been kit-based, but I think I prefer the normal format.

What would you do with the bits I’ve got left?


Linking up to Handmade Harbour’s Handmade Monday blog.

Handmade Harbour

Digi Stamps for Beginners – tutorial

I like making cards.   It’s one of the reasons that Craftyguider came into being.   I had so many things I wanted to try, and not enough friends and relatives to send cards to!   I can now make what I want, when I want, and any cards that aren’t intended for a specific recipient, go into my shop stock.   I sometimes raid my stock for cards too as everything I make is the same quality as I would use for my best friend’s card.

IMG_8180personalisable car card from craftyguider.com

One of the techniques I’ve never used is digital stamps.   Some of the paper crafters on twitter rave about them, but I’ve only ever used the stamps you ink up and print yourself.   Digi stamps provide the same outline image as an inked stamp, but they differ in that you can manipulate the image, for example by changing the size or flipping the image.   There is no physical stamp to store either as, once purchased, the image is emailed to you to download and store on your computer.

Handmade Harbour has come into the world of digi stamps in the last few months.   Wendy Massey has many gorgeous designs for almost every occasion to purchase and use to make cards.   She recently offered bloggers the opportunity to use digi stamps in a tutorial, and I was lucky to be chosen to receive a selection.   This will be the first time I’ve ever used digi stamps so this is a true beginners guide.

1. Obtain your digi stamp.   I chose this cute baby in bed with patchwork quilt as there are a number of babies due to friends and family in the next few months.

IMG_3367

2. Save the image that is attached to the email you receive to your computer.   I am no techie, but I managed this without help.   Going well so far!

IMG_3371

3. For simplicity, I copied and pasted the downloaded image to a new Word document.   I only needed to change the size and didn’t need any accurate dimensions.   It was my first attempt and ‘ish’ was good enough.   I based my design on a sketch from a Craftwork Cards Recipe Card from QVC.   Even though my card will look nothing like this, the elements I use will fit the sketch in the top right hand corner.

IMG_3369

4. Print the design onto good quality paper or light card.   Whatever you can get through your printer.   Trim the image leaving a border.

IMG_3374

5. And now the fun part – colour it in!   I love promarkers, but you can use whatever colouring method you prefer.   tip – I made a border around the edge using a ruler and a promarker so the image matched

IMG_3383

6. I printed another image slightly larger and used three squares as my accents.   I raised these and the ‘congratulations’ message using sticky foam pads.   tip – if you are posting your card, it’s cheaper to send if the image is flat rather than using foam pads

IMG_3385

7. Ta dah!   Now I’m going to hurry down the road to my neighbour’s house as she’s just given birth to a lovely baby girl.   Hope she likes it!

IMG_3387


I obtained the digi stamp for free from Handmade Harbour, but the words, images and opinions are my own.